hosting, webhosting, web hosting, host, webhost, web host, เว็บโฮสติ้ง, เว็บโฮส, โฮสติ้ง, จดโดเมน, เวบโฮส, เวบโฮสติ้ง, เวบโฮสต์, เว็ปโฮสต์, โดเมน, โฮส, โฮสต์, domain name, domain registration, จดทะเบียนโดเมน, จดโดเมน, จดโดเมนเนม, พื้นที่เว็บไซด์, พื้นที่เว็บไซต์, เช่า hostr
ขอความร่วมมือผู้ที่คัดลอกบทความข้อมูลของทาง naxza web hosting ไปใช้ เพื่อให้ข้อมูลข่าวสารด้านโฮสติ้งต่าง ๆ นั้น กรุณาทำ link กลับมายังต้นฉบับบทความด้วยครับ หากตรวจสอบพบการละเมิด ทางเราจะดำเนินคดีตามกฏหมายโดยทันที


Hosting Article : | 1 | 2 | 3 | 4 | 5 | 6 | 7 | 8 | 

การติดตั้ง joomla บน hosting จริง ระบบ hosting unix (ตอนที่ 3)

จดโดเมน

เมื่อ upload ไฟล์ชุดติดตั้ง joomla ลงบน hosting ผ่านโปรแกรม FTP เรียบร้อยแล้ว หากเราลองเข้าที่หน้าเว็บไซต์ของเราผ่าน www.ชื่อโดเมน.com จะพบหน้า default ซึ่งถูกสร้างขึ้นโดยระบบ hosting ที่ใช้ control panel directadmin ดังภาพข้างต้น ให้เราทำการลบไฟล์ index.html บนฝั่ง hosting ออกก่อนครับ โดยจะมี index.php เหลืออยู่ จากนั้นลอง refresh ดูสักครั้ง จะพบขั้นตอนการเข้าสู่กระบวนการติดตั้ง joomla บน hosting จริง ดังภาพข้างล่างครับ


ให้เราเลือกขั้นตอนการติดตั้งเป็นภาษาไทย th-TH ครับ เผื่อที่จะได้เข้าใจได้ง่ายครับ


จากนั้นกด ถัดไปครับ จะมีขั้นตอนในการตรวจสอบความพร้อมของ hosting ว่าได้ตั้งค่าต่าง ๆ ไว้พร้อมที่จะติดตั้ง joomla หรือไม่ครับ

ก็คือทำให้ทุกส่วนเป็นสีเขียวหมด คือจะมีความพร้อมสูงสุด ในขั้นตอนนี้อาจจะต้องมีการสร้างไฟล์ .htaccess ลงบน hosting เพื่อกำหนดค่า configuration บางอย่างเช่น

php_flag display_errors On
php_flag magic_quotes_gpc Off


เมื่อค่าทุกค่าเป็นสีเขียวหมดแล้วให้กด ถัดไป จะเป็นกระบวนการในการยอมรับในเงื่อนไขการใช้โปรแกรมลักษณะ Open Source (GPL General Public License) ให้กด ถัดไป

เพื่อเข้าสู่ขั้นตอนการตั้งค่าการติดต่อฐานข้อมูล ซึ่งตรงนี้จะมีรายละเอียดต่าง ๆ เกี่ยวกับ hosting ที่ทางเราจัดส่งไปให้ตาม E-mail ที่ใช้ในการสั่งซื้อ hosting เรียบร้อยแล้ว ในส่วนของชนิดของฐานข้อมูล ให้เลือกเป็น MySQL ส่วนชื่อโฮสต์ ให้ระบุเป็น localhost สำหรับชื่อผู้ใช้ฐานข้อมูล คือ Database User ให้ดูตามรายละเอียดการใช้งาน hosting ที่ทางเราได้จัดส่งไปให้ รวมถึงรหัสผ่านของ Database Password และชื่อฐานข้อมูล Database Name ด้วย


จากนั้นกด ถัดไป จะเข้าสู่การตั้งค่าระบบ FTP ตรงนี้ให้เลือก No เพราะเราจะทำการสร้างไฟล์ configuration.php เองไม่ผ่านระบบ FTP เนื่องจากระบบ FTP จำเป็นต้องระบุ ชื่อผู้ใช้งาน FTP และ Password ลงบนไฟล์ ซึ่งอาจจะทำให้ระบบความปลอดภัยของเว็บไซต์ joomla นั้นต่ำลง และอาจโดนโจมตีเว็บไซต์ ได้โดยง่าย


จากนั้นกด ถัดไป จะเป็นการตั้งค่าระบบหลัก ให้กำหนดค่าได้ตามต้องการ หากต้องการให้ joomla ติดตั้งข้อมูลตัวอย่างให้ด้วย เพื่อความชัดเจนในการดูให้เป็นเว็บไซต์เบื้องต้น ก็กดที่ปุ่ม ติดตั้งข้อมูลตัวอย่าง จากนั้นกด ถัดไป ก็จะเสร็จสิ้นกระบวนการติดตั้ง joomla บน hosting จริงแล้วครับ ต่อไปเราจะมาดูในเรื่องของระบบการรักษาความปลอดภัย การตั้งค่าความปลอดภัยให้กับ joomla และการติดตั้งระบบภาษาไทย สำหรับ joomla ครับ


when upload file sets installed on joomla hosting via FTP programs already If we try to page through our site. www. a domain. com to find pages that are created by default system based hosting control panel directadmin as shown above. Allow us to delete the file index.html on the side before hosting related posts will remain index.php refresh and then try once more to see step into the process of installing on joomla hosting the actual picture below

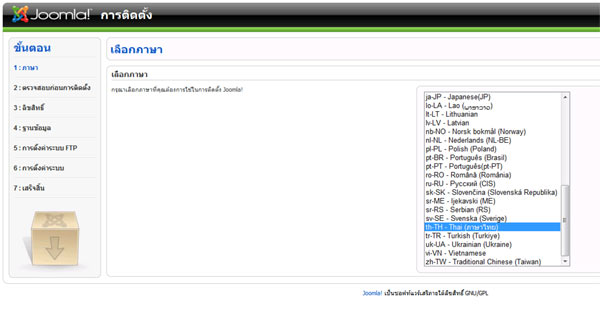
us to choose the installation steps into Thai th-TH allowance to be understandable

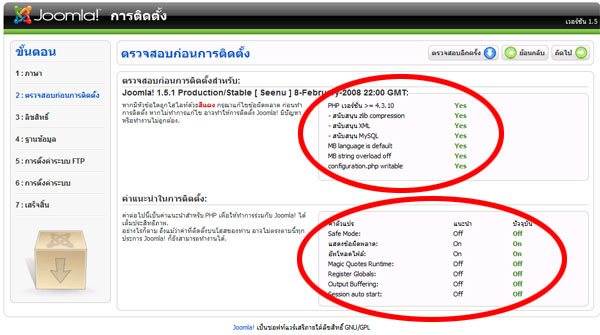
then click Next step will be to verify that the availability of hosting it with different settings to install joomla or no!

is to make all the green out. Is to have maximum availability. In this step may need to create a file. Htaccess to set up on hosting. configuration. Something like

php_flag. display_errors On
php_flag magic_quotes_gpc. Off


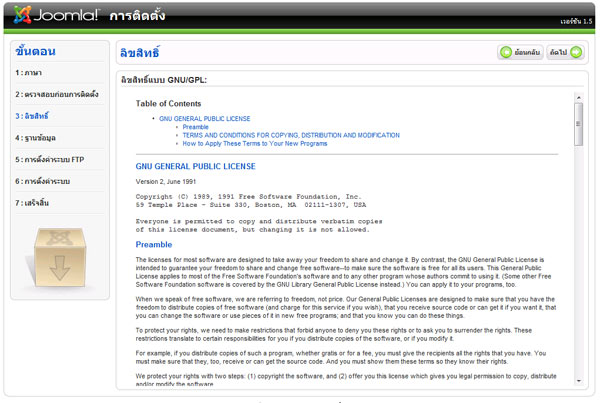
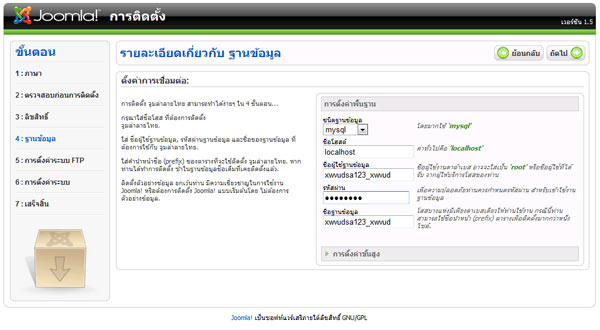
on the all the green out, press next in the process of accepting the terms of use features Open Source (GPL General Public License. ), press Next to enter the process of setting up contact database Here is where all details about the hosting that we mailed to the E-mail used to complete the purchase hosting. In the category of a MySQL database, select the host name, specify localhost for the database user name is Database User to view the details of hosting that we use are mailed to. As well as password Database Password Database Name, and a database with

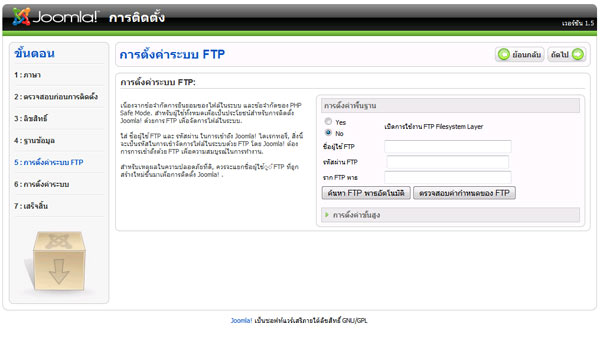
then click Next to enter the FTP system settings, select No, because here we will create file configuration.php. Own not via FTP because FTP required. FTP Username and Password to a file that could cause the security of the joomla site being down and may attack site. Easily

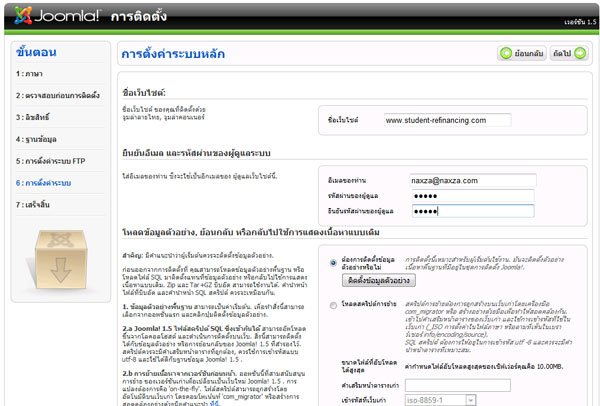
then press next will set the main system. To configure as needed. To allow joomla to install the sample data with To highlight our view that the site basics, simply hit the button to install the sample data, and then click Next it will complete the installation process joomla on hosting actually Next we will see in terms of system security. The security settings to install joomla and Thai for joomla
.

Hosting Article : | 1 | 2 | 3 | 4 | 5 | 6 | 7 | 8 | 

hosting, webhosting, web hosting, host, webhost, web host, เว็บโฮสติ้ง, เว็บโฮส, โฮสติ้ง, จดโดเมน, เวบโฮส, เวบโฮสติ้ง, เวบโฮสต์, เว็ปโฮสต์, โดเมน, โฮส, โฮสต์, domain name, domain registration, จดทะเบียนโดเมน, จดโดเมน, จดโดเมนเนม, พื้นที่เว็บไซด์, พื้นที่เว็บไซต์, เช่า hostr

HOME   |   ABOUT US   |   HOSTING   |   DOWNLOAD   |   SUPPORT   |   CONTACTS
Copyright © Naxza.com,Since 2004. All Rights Reserved. Privacy policy. monitoring site uptime web